Making a panorama- a first attempt
Kia ora tatou:
Some 12 years ago, I owned a view camera. The 18 months I spent with it were edifying… and frustrating. It was a painfully slow and fearsomely technical way of making photographs. But the discipline of using one has paid off in all sorts of ways. A fortnight ago some of those hard-won lessons came back to me.
Back in the archives I talked about panoramas and how to think about them. I received a comment from Barbara asking about stitching and how to get the exposures even. I have held off answering because these are early days and I have yet to find the right bit of software at the right price. I will get back to you when I have an answer to that. My first impression is that it is important to match the histograms on all the images you intend to stitch, so the highlights sit at around the same point. Using Manual mode is probably the easiest way to do this.
Until now I have made panoramas by cropping down my images. This is a good method, but one which tends to reduce the size of the image and therefore the scalability of the image. A 16Mp image from my Canon becomes a 12Mp image when I crop it, and as result scaling up becomes fraught. The whole point of a panorama is to make it big, so they eye takes time to traverse the image, in the same way that it did when the photographer made it. So there has to be another way.
Darren Leal of Wild Visions suggested a method that makes sense. He mentioned using a shift lens. He described the method as simple. Meter manually, rack the lens to one side, expose, then rack it to the other side and make another exposure. Then use PhotoMerge in CS2 to join the two together. Hmmm, I thought.
I had a contract at the time to do some architectural photography, so the expense of a tilt/shift lens was justified. And of course, I had ulterior motives.
Those of you who have had experience with a view camera know about tilt, shift and swing. It is perfect when you want to avoid keystoning, to get your perspectives and planes perpendicular. It works this way. Imagine you want to photograph a building. If you want to get everything parallel, horizontally and vertically, then you need to stand at right angles to what you are photographing. If not then the planes of the building will not be straight (parallel). Sometimes this means you need a cherry picker or a very tall ladder. A view camera user knows all about this. It is possible to correct the perspectives from the one place without these.
Note: You can fix these things in PhotoShop as well. Just go to Filter > Distort > Lens Correction.
Canon and Nikon and Mamiya, to name a few, all make shift lenses, which enable you to achieve a similar effect. The front lens elements move independent of the rear ones and allow you to displace the image circle on the film plane. The canon TSE lenses allow you to shift,
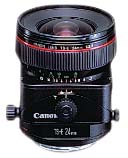 either vertically or horizontally (and in-between), as well as tilting the lens, which allows you to employ the Scheimpflug effect. The what, you say? Put simply, it allows you to increase or decrease depth-of-field, i.e. to give you f64 DOF at f16. It is possible to have your cake and eat it too….sometimes. The TSE lenses allow you to use in-camera metering, but you have to focus manually (reaches into memory banks for hyperfocal distance knowledge..)
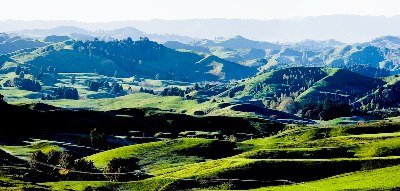
About a week and a half ago, I was travelling north to Auckland, and was just south of Te Kuiti when I saw this scene. Aha, he said. Time to have a go. The scene was wide and expansive, and the hills stepped away into the background. In the distance I could see Ruapehu.
I set up the tripod and levelled it as accurately as I could, using the Bubble-thingy. You can buy expensive levelling heads for this kind of work, but you would need to be doing a lot of this kind of thing to justify the expense. This is the first rule of making panoramas. You must get the tripod head level. Greater care at this point means you will have less to crop later on.
I framed the scene and then racked the shift left and right to check what I would get. I then made a trial exposure in RAW and checked the histogram to make sure it wasn’t clipping.
Then I made two images at the same exposure setting and again at a slightly different setting, ensuring that the exposures were the same for each pair. It would seem to me that this is critical. Stitching software, especially PhotoMerge, hates different tones when it comes to merging. I used Manual exposure to ensure that the exposures remained the same. This is one of the few occasions I have ever used it.
I also ensured that there was at least 25% overlap. Remember that software stitches by comparing pixels from different images and then uses these similarities to make the join.
To CS2, then. Open the image in Bridge, go to Tools>PhotoShop>PhotoMerge and wait while the processor howls. A small amount of Smart Sharpen, then back into Lightroom to tweak the colours.
The finished image is 8-bit, which I then converted to 16-bit tiff. Finished image size? 6688 x 3189 pixels @ 240ppi, 122Mb, or 27” X 13” before upsizing.
This is my first attempt. I suspect I have opened a can of possibilities, and a new way of doing things.
I invite questions and comments.
Ka kite ano
posted by Tony Bridge @ 13:21
![]()
![]()

5 Comments:
I have to ask — what was the reason for converting from 8-bit to 16-bit? Isn't that analogous to enlarging a newspaper photo; i.e. the photo's bigger but has no more information?
I can understand going the other way (16 to 8 bit).
Hi Pete:
good point.
Rather than me explain it, have a look here:
http://www.earthboundlight.com/
phototips/
8bit-versus-16bit-difference.html
Hi Tony
I do a bit of this panorama stuff. I use a manfrotto pan head and stitching specific software. I agree it is essential to use manual focus to make the images. Polarizing filters also stuff things up and another trap is white balance. If you use AWB when capturing a range of images for a panorama, the white balance setting will likely change at some stage and you will get those tone differences that will muck up your blending software.
You've mentioned in the last two articles you shoot in program mode. I've never figured this one out, it actually scares the hell out of me the lack of control you seem to have in program mode. Will you tell me why you do this and how you have creative control of your camera.
I always use manual and I've even thought about sending my cameras to canon to see if I can have the microprocessors I don't use pulled out and traded on another lens!
Cheers
Andrew
Hi Andrew:
Thanx for your comments and advice, really helpful. Rather than mention those things here, I think I will do a post on the various mades in the very near future. It's a question i get asked all the time.
Thanks for this post Tony - it makes sense - the challenge is to try it - slowly - and make it work - but then good things do take time! Will stick with the digital - don't plan to invest in a film view camera any time in the future - I have enough "obsolete" film cameras in the cupboard! I look forward to future posts on this topic!
cheers
Post a Comment
<< Home