BluePrintX

Photography should be about picture-making. That is, after all, why we get into it in the first place (well, most of us). This blog is for photographers, people passionate about making photographs, who want to share ideas and concepts, approaches and attitudes. And yes, there will, from time to time, be gear stuff. Oh, and by the way, while you can download and share this blog, all the material on it is copyrighted. All rights reserved, etc.

Friday, December 30, 2005

Winter Workshop (not for the faint-hearted)


OK, Blatant plug time.
As one or two of you may know, I am involved in a couple of workshops this year. In April I will be working with Freeman Patterson and Sally Mason on a 1-week workshop in Martinborough, New Zealand (all you wine-lovers can stop sniggering now!). Unfortunately that one is full.
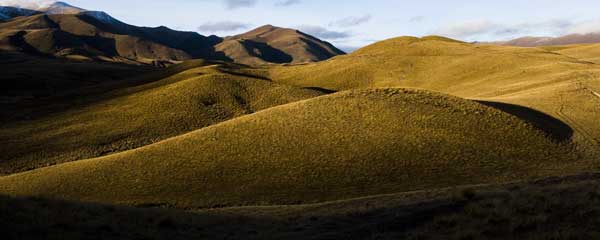
If you have a thing for beauty, gorgeous light and amazing landscape, then you might be interested in this one….
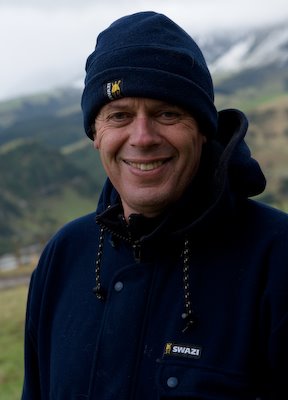
I am working with Darran Leal of Wild Visions in Australia. Darran has been doing highly successful tours for years now and is highly respected. You may even have been on one of his workshops yourselves. He asked me to come up with a dream workshop in New Zealand. So this is it…
We will be getting up really early, traveling to remote landscapes in Central Otago to photograph the early morning light, then working through the day. Home to base in the evening, food and a few drinks, then a lecture/practical session led by Darren or myself.
The workshop dates are July 11-15, 2006.
To find out more/book, contact Darren here and/or visit his website

Wednesday, December 28, 2005

DSLR-killer? The Sony DSC-R1


If,as I do, you like shooting life in the street, and you do it whenever you get the chance, then you will have probably have tried it with a digicam (one of those small point-and-shoot cameras). You will have hated the shutter lag on them, but appreciated the anonymity. The image quality may well have irritated you and the tonal range may well have annoyed you as well. The ability to make big prints as well. Bridge’s Law (2005) states that: the importance and final size of an image is inversely proportional to the size of the sensor available at the time of capture.

If you are a film shooter, then the Leica M-series has to be the camera of choice. Made famous by Cartier-Bresson, it has a 70-something year heritage and a process of being continually refined to suit its purpose-shooting Life. But of course lots of us have forsaken the silver grain for the pixel, and what is there that fills that need? The Digilux 2? Small sensor-outrageous price. The Fuji 9500? Noisy sensor and prone to highlight clipping. The Olympus 7070? Perfect-if you can get one. Now discontinued. So what then? I love shooting the street. Significant amounts of my work involve Life and life on the street. But it needs to be up for portraits and landscapes. So I wrote a wish list for the perfect street/documentary camera:
  1. Sensor able to compete with my DSLR; capable of exhibition-quality enlargement to 12X18”.Maybe even bigger. That means a minimum of 8Mp.


  1. Zoom lens from around 28 to 135. You can shoot 90% of your work on that.

  2. Fast shutter response. Close to that of a DSLR needed.

  3. A normal card format so I don’t have to get yet another multi-card reader. Compact Flash would be best, since my work cameras run this.

  4. Superb lens. It’s the lens that determines the final image and imparts itsd own character to the final image. F2.8 would be primo.

  5. Excellent colour straight out of the sensor.

  6. Great dynamic range.

  7. A live histogram, so I can make exposure adjustments as I work. DSLR’s don’t have what is one of the serious digital photographer’s most useful tools. Happy snappers do.

  8. Intuitive controls and ergonomics.
I don’t ask for much, do I?

Over the last 2-3 years I have tried a lot of cameras. Some were dogs. Terrible ergonomics, sod-all film speed range, shutters that went off ages after you made the decision. Others were nice to use, until you made the print. Then the noise and abrupt tonal transitions became apparent. Oh well, it had to get better one day…And it has.

Enter the
Sony DSC-R1 DSLR. For the last month or so I have had the use of Sony’s latest-generation digicam. Let me tell you a bit about it. No, this isn’t going to be one of those exhaustive part-by-part descriptions. Phil Askey at DPReview has done that. You can read it here. These are my comments as a photographer.. I want to use it, not kiss it goodnight and, since I am a bloke, preferably without having to read the manual. But it does have some cool things I need to tell you about. In no particular order:
  1. A Carl Zeiss 24-120 2.8-4 T*(35mm equivalent) lens. Thoughts: minimal barrel distortion, very little CA. Stunning. The zoom ring is manual and it has fly-by-wire manual focusing. This makes its use quite intuitive.

  2. A 10.3MP CMOS APS-C sensor, the same size as a 20D/350D/D-70S. Because the sensor is bigger, it produces less noise than the smaller PSD (push-here-du**y) cameras. You can really see it when you have made a 13 x 19” print. There is a tiny bit of noise in the shadows, but nothing that can’t be smoothed out with NeatImage or Noise Ninja.

  3. Ability to shoot RAW. You do get a jpeg with it (whether you want it or not), so unless you really want the jpeg, I suggest you wind it right down to save space on the card.
Tip: If you want a black-and-white image, shoot in RAW and large jpeg. The latter will be in B&W, the RAW file in colour. The B&W out of the camera is really rather good, and requires very little further manipulation.
  1. A live histogram that can be adjusted manually via the control wheel on the back using a system similar to that on my 1Ds Mk II. Very intuitive. After 30 minutes or so, it felt as if I had been using it for months.

  2. Very little shutter lag, especially when you set the camera on Monitor function

  3. Dual card slots. Memory stick and CompactFlash. No new card formats.

  4. A top-mounted LCD screen. Some reviewers have commented that it doesn’t work, that it’s clunky. Curiously enough few of them post images that are real-world. Bowls of flowers in the studio or a house in the distance aren’t real-world to me.

  5. An EVF, i.e. TV-screen viewfinder. It takes a little getting used to, but it’s really accurate and there is very little delay. Unlike some of the others, there is a degree of realism to the image.

  6. An intuitive autofocus mode. Set it and forget it.

  7. Superb colour. Primaries are strong, pastels and neutrals suitably understated.

  8. You can turn the shutter sound off. They have no idea when you press the shutter. Lovely!

  9. The Sony Infolithium battery. It really keeps you informed of how much power you have left.
I tried the Sony DSC-828 when it came out. It had that diabolical 8MP sensor which most of the other manufacturers used ( Olympus, Canon et al.) Horrible colour, lots of noise, terrible CA. A dog.. This time Sony has got it right. If you want a high-end digicam without the vices of a DSLR (dust, heavy camera bags, average lenses), then the DSC-R1 may well be it.

I took it out for a series of test drives to my favourite shooing patch at New Brighton in Christchurch, New Zealand. There was a bit of a market on, so I moved around shooting, then took the images home, downloaded them into Photoshop CS2 and evaluated the experience.


The camera is quite intuitive. It took very little time to get used to it. The Live histogram really works and is quite accurate. The camera feels comfortable and the controls fall naturally to hand,
The lens is a killer. I compared it with images from my Canon 1D MK II using a 24-70 2.8L lens and I am damned if I can spot the difference. The Canon images may be a little more noise-free and smoother, but the differences are marginal. The prints have a wonderful colour and are as sharp as they need be. I need to mention that I lower in-camera sharpening and then bring it back in CS2).

Yes, there some irritations: the buffer is too small, and it takes a long
time to write subsequent images especially if you are shooting in RAW; RAW files take up 20Mb each ( more than the 16MP 1Ds MK II), so plenty of storage is in order; low-light focusing requires a bit of anticipation. And high ISO images are really noisy. These are small things however.

The bottom line: this is a stunning camera suitable for just about anything. It more than compares to the 20D and its ilk, It doesn't need extra lenses, regular cleaning of the sensor or a huge camera bag. At around $NZ1500 it is indirect competition with the 350D/5D/D70S. In my opinion it more than matches them for ease of use and image quality.
Would I work up a book or an exhibition on it?
You betcha.

Tuesday, December 27, 2005

Harriet


I suppose I have been teaching photography for
some 20 years now, and I have seen some wonderful images made. Every so often however, I get a student whose work blows me away and makes me feel hopelessly inadequate.
A sort of bugger-why-didn’t-I-see-that feeling. It usually happens several times
a year. And that is great. It encourages me and oftentimes reminds me how many good (no, great) images are being made all the time, born to blush unseen and waste their sweetness on the desert air, to quote Gray.

And then there are the geniuses who really do have the talent and the determination. They are so good that I wonder what I could possibly have to offer them. Their work is damned consistently stunning that I have to make sure it gets shared, any way I can. So I intend to use this blog to show what they are doing.
By now you will be looking at the images in this post and maybe wondering about the auth
or-in this case, authoress.

Harriet has been a pupil of mine for the last 10 months or so. She turned up with one of those 3 megapixel point-and-shoots that some of my
learners bring along, you know the ones that most of us use to snap our family events. With very little input on my part, she got on with it, asking only for the odd bit of advice here and there, and doing it her way. I am glad I kept my big clodhoppers out of it. Her vision is too unique to be directed. These images are humbling, living proof of the adage that it’s not what you’ve got, it’s what you do with it that counts.

Harriet posts her work to an online community called
deviantART( no it’s not what you think). If you want to see what the new generation of photographers are doing go trawling through it. Some very exciting work here. You can find Harriet’s section here.

Oh, and did I mention?
She is just 17

Tuesday, December 06, 2005

RAW converters- not all are created equal


By now, if you are doing the digital photography thing, you've probably experimented with shooting images using the RAW format. If you are new to doing this, you may even have used the manufacturer's software- the logical thing to do, you would think. However RAW can appear a bit daunting at first glance, and for some people a real minefield.

In fact it isn't. There is a lot of help out there. One of the best articles I have read on using it for exposure is on Michael Reichmann's excellent Luminous Landscape site. You can find the article here.

But wait, there's more...If, like me, you are the restless type and a software dipper (you have to to try the latest software/update), you will have noticed that are a lot of raw converters out there, ranging from the supplied-with-camera type to really expensive things like Aperture and Capture One Pro. So which one do you go for? Actually which ones do you go for? I would like to suggest that the best path invloves using at least 2. Let me explain. But first, a little history.

The first time I tried RAW, back on a Fuji S2, I was underwhelmed. There didn't seem to be half the controls I had read about. I later found out why: for a little extra(!!!) I could buy the Hyperutility software. Then I got functionality-if I had a mainframe to process it on!

Move on a step to the E-!. Again the manufacturer's software, which caused a major crash and rebuild for my PC. By now I was learning, and happily fell into the arms of CS1 with its(mostly) excellent Adobe Camera Raw. I say mostly, because the colour from the software was a bit bland for my tastes. So I went looking...and realised that there were an increasing number of dedicated raw converters out there. Favourites included Breezebrowser and Bibble. I experimented with Capture One Pro, but the $NZ 900 price tag was a bit too rich for me!

Along came PhotoShop CS2 and ACR (Adobe Camera Raw). A big improvement on CS1, with curves added into the palette, pre-conversion cropping and horizon straightening, to name but a few. Combined with Bridge, the new stand-alone file browser app, it makes a fairly unbeatable combination. Granted you can batch process to a degree, but it seems to me to be a workflow that favours a single image. When I come in from a shoot with maybe 500 images, I still want to have a life and anything that speeds things up is worthy of consideration.
I shoot Canon, so I occasionally use Digital Photo Professional, the app that came with the camera. Good for some things, but not for all.

Enter Rawshooter Essentials. I had heard about it on Rob Galbraith's site and went hunting. The initial version was a shocker barely out of beta. More bugs than my windscreen on a hot summer's evening. It wouldn't even run on an AMD-equipped PC. But they ironed the faults out, and while PC-only (sorry Mac users), it is a very nice product. I am not sure, but it has a feeling similar to Capture One. Things I like include:
  1. Sharpening algorithms built in. It automatically sharpens the image unless you tell it otherwise. You can fine-tune the sharpening if you wish.
  2. A set of "looks". I shoot a lot of landscape and the default settings give me the closest look I have got to film. There is a wonderful richness to finished images that really reminds me of transparency film. Again you can tune hue, saturation, shadow and contrast if you want to. The conversion algorithms are quite intuitive. I suspect a real photographer has been involved in its development.
  3. The ability to prioritise by labelling images and then batch-converting final selections. CS2's labeklling system is, I have to say, a bit better. But not much.
  4. VERY powerful batch conversion. Click one button and it goes away and converts in the background while you get on with the next image. Or take a pile and send them to convert in the background. best of all it doesn't seem to slow the program down in any way.
  5. A clean uncluttered interface. It may appear a bit bald the first time you look at the app. have a look round at each of the icons and you will discover that the is a lot of power lurking in the background, hidimg there til you need it. This is one of my beefs with Bibble. Too much is on-screen and I find the image drowns amongst all the palettes
  6. The ability to batch rename files. I have to say, on this score, CS2 does it better, with a more intuitive interface and greater options.
  7. Best of all, IT IS FREE!
But wait, there's even more.. The nice people at Pixmantec have come up with RawShooter Premium, which adds functionality, including a control called vibrance. Sort of like a saturation control with contrast added. You can import directly into RSP. It builds previews while you download, so there is no waiting around to get to work. The curves tab has greater functionality. The list goes on..
Of course they want to get back their R&D, so there is a price. $US99. To my way of thinking, it is cheap at 2x the price, especially when you look at the price of Capture One, and every bit as good.
So why would you want more than one raw converter? After playing with all these different apps, it dawned on me that there was a good reason. Let me explain.

When I worked in a darkroom (remember them?), i would use a range of film developers. I loved Tri-X, but I learned that the choice of developer had a big impact on the final negative. Sometimes I used the venerable D-76, sometimes Xtol, and occasionally Rodinal or Ultrafin. Each imparted a certain character to the negative and therefore the printed image. Over time I learned which ones to use for which jobs.
It's all about Craft.
I am now convinced that the same approach applies to the digital era. Your image "look' is significantly affected by the camera (sic. sensor) you use. The same thing happens with raw converters. Each imparts a distinct personality to the finished image.
But don't take my word for it. Try them out for yourself and see which apps suit the type of photographs you shoot.

Friday, December 02, 2005

Getting out of bed- and staying up late!


The other day I saw a book
done by a contemporary of mine, who had photographed the region in which he now lives. keen to see what he had made of the region, I worked my way through it. There were some lovely images, that paid a real tribute to the region ( I won't tell you which region, because that would make it dead obvious who he is- and he knows me!).
What struck me however, were the number taken in the middle of the day, with a high sun that flattened out the landscape and hid the subtleties peculiar to that particular landscape. There were very few photographs made at each end of the day, when the light is at its most dramatic and sensuous. It was as if he was programmed to go out after breakfast and be back by teatime.
These were cheese sandwich photographs- they did the job, were very well made, but somehow overlooked the mystic qualities of a part of New Zealand that is redolent with history and dominated by one of the most powerful geographical features in the country.
Making photographs in the middle of the day is tough,photographically-speaking, and the light is usually harsh and unforgiving. It reminds me of the story told by the eminent photographic historian, Beaumont Newhall, who maintained that while Wynn Bullock's nudes looked as if he wanted to make love to them, Edward Weston's looked as if he just had! Working through the middle of a summer's day is the Weston approach. All is revealed.
It is at sunset, however, that the mystery begins, at the transition from day into night that the spirits come out. Landscape photographers are like fly fishermen- the best fishing is to be had at sunrise and sunset.
The moral then is to get up early and be out where you want to be before sunrise. At the otthere end of the day, to stay out until after dark
Tip: the best sunset shots come at least 20 mins after the sun has set.
Which brings me to the shot in this post
it was the tail end of the day, at the mouth of the Okuru River in South Westland. Maybe 30 minutes remained in the day and the light was grey and dull behind the clouds. A gap remained however between the horizon and the clouds. if I waited I would have a few minutes and (hopefully) amazing light.
There was a nasty easterly wind bvlowing off the Alps and we were tired, hungry and ready for a fire and a few glasses of Shiraz. It was tempting to say "Bugger It!" and head indoors. We stayed.
And for a magic few moments it was all worth it.

Thursday, December 01, 2005

November News


Kia ora tatou:
After battling with my ISP, who think any email to more than 80 recipients must be spam, I have switched to a blog. That way you can come and go as and when you wish. i intend to get a link installed from my website so you can hook in directly.

It's been over a month since i sent out the last one, and in tha time I have been thinking about what would be of most interest to you all. feedback so far suggests that the Blueprint section has been popular, so, as I make images that i want to share with you, I will put them up. Feedback is always interesting, so you should be able to be involved as well (when and as I get the hang of this blogging thing.)
Watch this space on a regular basis....and feel free to contribute....
Ka kite ano
Tony